How to bounce a song in Logic Pro
Quick answer
Choose File > Bounce > Project or Section, select PCM in the Destination list, set File Format to Wave, Resolution to 24 Bit, Sample Rate to match your project, File Type to Interleaved and Normalize to Off, then click Bounce. If Cycle mode is on, only the cycle range is bounced, so check the Start and End fields first. Add MP3 or M4A: AAC as a second destination when you also need a small file.
Platform and version
Bounce a project or a section, step by step
The steps below follow Apple's Logic Pro User Guide page on bouncing a project to an audio file. Menu and option names are given as they appear in Logic Pro 12.
- Check the routing. In the Tracks area or Mixer, make sure every track you want in the file is routed to
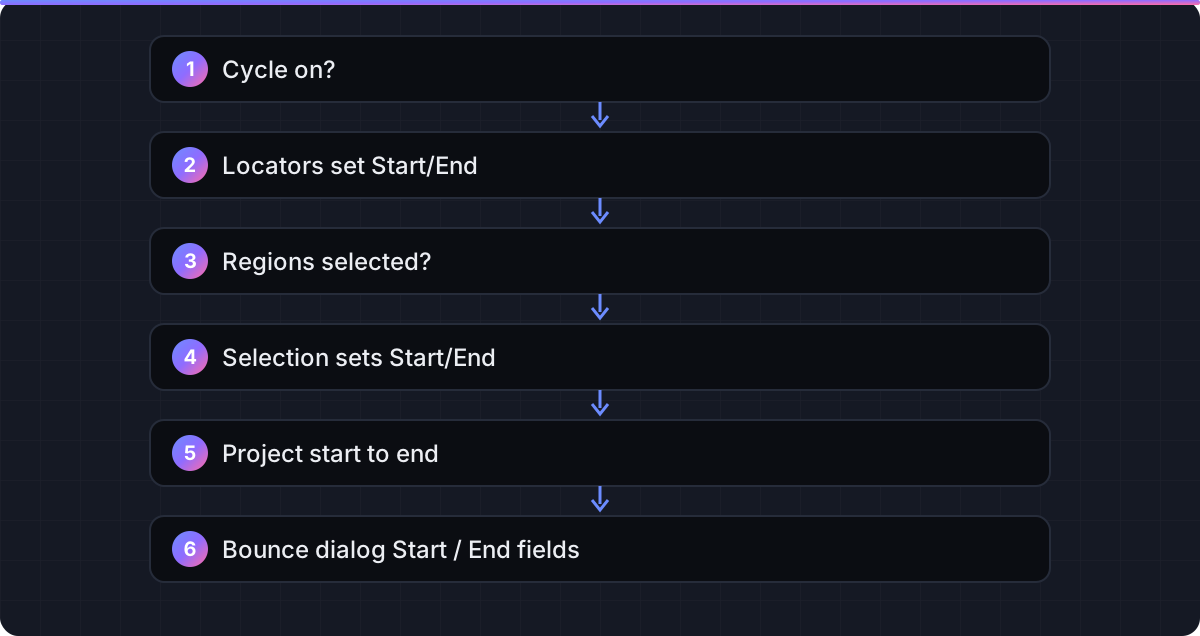
Output 1-2and is not muted. If you use several output channel strips, theBncebutton on a strip bounces only what is routed to that strip. - Set the range. Logic takes the bounce range from one of three places, in this order: the cycle area when Cycle mode is on, the selected regions in the Tracks area, or the whole project when neither applies. To bounce a section, set the locators and turn Cycle on; to bounce the whole song, turn Cycle off and deselect regions. You can also type into the
StartandEndfields in the dialog itself. - Open the dialog. Choose
File > Bounce > Project or Section. The default key command isCommand-B. - Choose destinations. In the Destination area, tick one or more of
PCM,MP3andM4A: AAC. The options for each ticked format appear to its right. Ticking more than one writes several files with the same name and different extensions. - Set the PCM options.
File Format: Wave, AIFF or CAF.Resolution: 24 Bit for anything you might process again, 16 Bit only when a service asks for it.Sample Rate: the project rate (44.1 kHz for music, 48 kHz for video).File Type: Interleaved, unless a Pro Tools session needs Split files.Dithering: pick a dither type only when going from 24-bit to 16-bit; otherwise None. - Choose Realtime or Offline.
Offlineis faster and is the normal choice. UseRealtimewhen the mix uses external hardware inserts or an instrument that must stream in real time. - Handle tails. Either drag
Enda bar past the last region, or selectInclude Audio Tailso Logic extends the file until effects and instrument releases have decayed. Apple warns against Include Audio Tail when a mastering plug-in or the Test Oscillator is on the output, because those never fall silent and the file can grow very long. For a looped section,Bounce 2nd Cycle Passstarts the file at the second repetition so the first pass's reverb is already ringing. - Set Normalize.
Offleaves levels untouched (use this for masters and anything already mastered).Overload Protection Onlyturns the file down only if it would clip.Onraises the whole file so its highest peak reaches full scale. - Optionally tick
Add to Projectto put the bounced file in the Project Audio Browser. - Click Bounce. Name the file in the Save As field (the default name is the output channel strip, Output 1-2), pick a folder, and click Bounce. Apple's guide gives
~/Music/Logic/Bouncesas the default location, and Logic remembers a new folder for later bounces.
Bounce in Place: render one track or region inside the project
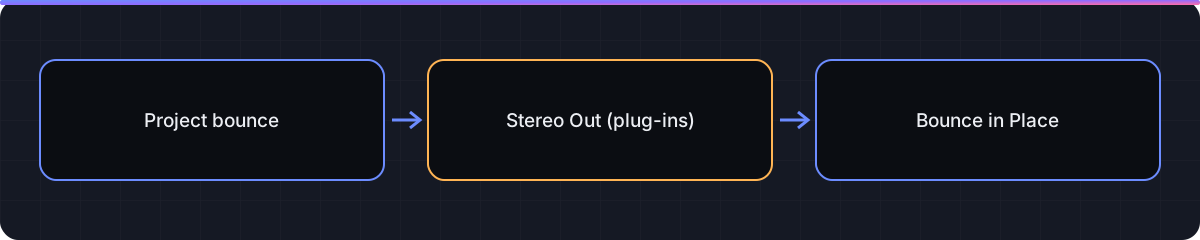
Bounce in Place turns a software instrument track, a region or every track into audio without leaving the project. Select the region and choose File > Bounce > Regions in Place (default key command Control-B), or use File > Bounce > Track in Place for a whole track. The File > Bounce > And Replace All Tracks command bounces every track and is useful before handing a project to someone without your plug-ins. Its dialog carries three options that Apple documents: Bypass Effect Plug-ins, Include Volume/Pan Automation, and the same three-state Normalize menu as the main Bounce dialog. Tick Bypass Effect Plug-ins when you want dry audio you can re-process later; leave it off when the plug-in chain is part of the sound.
Bounce only a cycle range
Set the left and right locators around the part you want, turn Cycle on (press C), and open the Bounce dialog. The Start and End fields pick up the locator positions. This is the quickest way to bounce a loop, a chorus for a client, or a sound-design hit. Remember to turn Cycle off again before the final full-song bounce; forgetting is the single most common reason a bounce comes out short.
Logic Pro for iPad: export via the project name menu
The iPad app has no File menu and no Bounce dialog. According to Apple Support, you tap the project name in the top-left corner, tap Export, then choose Uncompressed (AIFF or WAVE) or Compressed (M4A). Turn off Entire Project Length to set Start Position and End Position; with Cycle on, the cycle area sets those for you. Tap the information button next to the file type for format options, tap Processing Details for extra export options, then tap Export and Share to save the file to iCloud Drive or On My iPad. Apple recommends saving outside the Logic Pro for iPad and GarageBand folders.
Bounce settings by destination
Set the project's sample rate before you start recording if you can; converting at bounce time works but is a second-best option. The rows below assume a music project at 44.1 kHz unless the destination says otherwise.
| Destination | Destination checkbox | File Format / Resolution / Sample Rate | Normalize | Notes |
|---|---|---|---|---|
| Distributor or label master (Spotify, Apple Music via DistroKid, TuneCore, CD Baby and similar) | PCM | Wave / 24 Bit / project sample rate, Interleaved, Dithering None | Off | Keep true peak at or below -1 dBTP; see Mastering in Logic Pro. Check the distributor's spec page: some ask for 16-bit or 44.1 kHz specifically. |
| SoundCloud upload | PCM | Wave or AIFF / 16 Bit / 48000 Hz, Interleaved | Off or Overload Protection Only | These are the settings Apple gives in its SoundCloud upload article (see Sources), then upload the file in a browser. Add 16-bit dither when the project is 24-bit. |
| Demo or reference for email and messaging | PCM plus MP3 | Wave 24 Bit for the keeper copy; MP3 at the highest bit rate the MP3 options allow (320 kbps is the MP3 maximum) | Overload Protection Only | Ticking both writes a lossless and a lossy file in one pass. Keep the WAV as your archive. |
| Audio for a video edit (Final Cut Pro, Premiere Pro, DaVinci Resolve) | PCM (or M4A: AAC for a quick preview) | Wave / 24 Bit / 48000 Hz, Interleaved | Off | Video runs at 48 kHz. Hand the editor the WAV; use AAC only for a social-media preview or when file size matters more than editability. |
| Loop or section for a client | PCM | Wave / 24 Bit / project sample rate | Off | Set locators, turn Cycle on, and consider Bounce 2nd Cycle Pass so the loop starts with its tail already present. |
| Logic Pro for iPad | n/a (Export from the project name menu) | Uncompressed WAVE or AIFF; Compressed M4A for small files | Set under Processing Details | Save to Files outside the app's default folders, per Apple's guidance. |
What each PCM option actually does
| Option | Choices (per Apple's guide) | Pick |
|---|---|---|
File Format | AIFF, Wave (Broadcast Wave), CAF | Wave for everything shared; AIFF is equivalent quality. |
Resolution | 8 Bit, 16 Bit, 24 Bit | 24 Bit. 16 Bit only for CD or a service that requires it. Never 8 Bit for music. |
Sample Rate | 11,025 Hz to 192,000 Hz | Match the project. 44,100 for music, 48,000 for video. |
File Type | Interleaved, Split | Interleaved. Split writes separate left and right files and disables the Burn option. |
Dithering | None plus the POW-r dither types | Only when the file's Resolution is lower than the project's bit depth. |
Surround Bounce | Checkbox, shown when surround options are enabled in Advanced settings | Only for surround projects; it writes one file per surround channel and deselects MP3 and AAC. |
Add to Project | Checkbox | Tick when you want the bounce in the Project Audio Browser, for example to drag it onto a reference track. |
Check the file before you send it
Open the bounced file in the Finder with Quick Look (select it and press the Space bar) and listen to the first and last five seconds. You are checking three things: the start is not clipped, the tail is not cut off, and the file is the length you expect. A file that is suspiciously short almost always means Cycle was on.
Then drag the file onto a new audio track in the project, solo it, and compare it with the mix at the same position. If the bounce sounds different from the mix, the usual causes are a plug-in that behaves differently offline (try Realtime), a track routed to a different output, or Normalize set to On. If Logic stops with an overload during a bounce, the fixes on Logic Pro system overload apply to bouncing too.
If the next step is delivering individual tracks, go to How to export stems from Logic Pro. If you are sending the file to a streaming distributor, run it through Mastering Assistant first, or at least check its loudness and true peak there.
FAQ
What is the shortcut to bounce in Logic Pro?
Command-B opens the Bounce dialog (File > Bounce > Project or Section). Control-B bounces the selected regions in place.
Why is my Logic Pro bounce cut off or too short?
Cycle mode was almost certainly on, so the bounce used the cycle range instead of the project length. Turn Cycle off, deselect any regions, and check the Start and End fields in the Bounce dialog before clicking Bounce.
Should I turn Normalize on when bouncing?
Not for a master or stems. Normalize On raises the whole file to full scale and removes the headroom you left for streaming true-peak limits. Use Off, or Overload Protection Only if you just want clipping prevented.
WAV or AIFF: which should I bounce?
They are the same uncompressed quality. Choose Wave because every DAW, uploader and video editor accepts it; AIFF is fine for Apple-only workflows.
What bit depth and sample rate should I bounce for Spotify or Apple Music?
24-bit Wave at the project's sample rate, with Normalize off and dither set to None. Your distributor's spec page has the final word; some accept 16-bit or ask for 44.1 kHz only.
Why can't I see the MP3 or M4A: AAC options?
The options for each format appear only after you tick that format's checkbox in the Destination area. Tick MP3 or M4A: AAC and the settings appear to the right.
Does bouncing include the plug-ins on Stereo Out?
Yes. A project bounce renders everything that reaches the output channel strip, including its plug-ins and automation. Track exports via File > Export do not include the output strip.
How do I bounce in Logic Pro for iPad?
Tap the project name in the top-left corner, tap Export, choose Uncompressed (AIFF or WAVE) or Compressed (M4A), set the options, then tap Export and Share to save to Files. Apple's support article documents each step.
Realtime or Offline bounce: which is better?
Offline is faster and gives the same result for software plug-ins. Use Realtime when the mix relies on external hardware through I/O plug-ins or on anything that must stream in real time.
Related guides
Part of Bounce & export — see every guide in this hub.
 Guide
How to export stems from Logic Pro
One WAV per track, all starting at bar 1: the export dialog options, what to bypass, how to name files for a mix engineer, and the iPad ZIP export.
8 min read Guide
Mastering in Logic Pro with Mastering Assistant
Mastering Assistant on Stereo Out, step by step, with sourced loudness and true-peak figures, dither rules and an honest line on when a human mastering engineer is worth it.
10 min read Fix
Logic Pro system overload: how to fix the error (-10011)
What the System Overload alert means and Apple's documented order of fixes, from buffer size to freezing tracks.
10 min read
Sources checked
- Bounce a project to an audio file (Logic Pro User Guide for Mac)
- Uncompressed (PCM) bounce options (Logic Pro User Guide for Mac)
- Set the bounce range in Logic Pro for Mac (Logic Pro User Guide 12.3)
- Bounce all tracks in place in Logic Pro for Mac (Logic Pro User Guide)
- If you can't upload to SoundCloud from Logic Pro or GarageBand on your Mac (Apple Support)
- Bounce and save your Logic Pro for iPad project (Apple Support)
Last checked 3 November 2026 by the Logic Pro Files Team.